Thursday, January 17, 2013

Italian Butter Cookies

Italian butter cookie

I have searched decades for an italian butter cookie recipe to rival the likes of those found in NYC bakeries.  Veniero's Paticceria & Caffé butter cookies are my most favorite in the whole world.  Granted I have not travelled around the entire world so take that statement with a grain of salt.  I know I am not alone in my love for their cookies.  Throughout the years, I have found others along the way who share my appreciation for these tender cookies dipped in chocolate, sprinkles/nuts and sandwiched with jam in between. And like me, they too were on the hunt for this elusive recipe.  I had thought this would be a lifelong quest to find THE ONE, but I think I can check this off my bucket list of must-have recipes.  I thought I would be elated and jumping up and down, but I'm left feeling a little disappointed.  I'm not quite sure why...I should be happy I can finally make the cookie I love at home, but does it cease to be special now that I can have it anytime I want? In my household these need to be reserved for special occasions. Simply stated they are too dangerous to be in the house.

I do appreciate all the forums and blogs sharing their experience and recipes. I tried out 2 recipes this week and am pleased to say both were surprisingly good.  The first recipe I found on a forum uses mostly shortening, while the second recipe from the Crumb Boss uses equal parts butter and shortening.  The Crumb Boss uses almond paste while the other does not.  If forced to choose I would go with the Crumb Boss recipe for the added almond flavor.

Crumb Boss dough piped as shells

Crumb Boss Dough piped into 1 1/2" long cookies


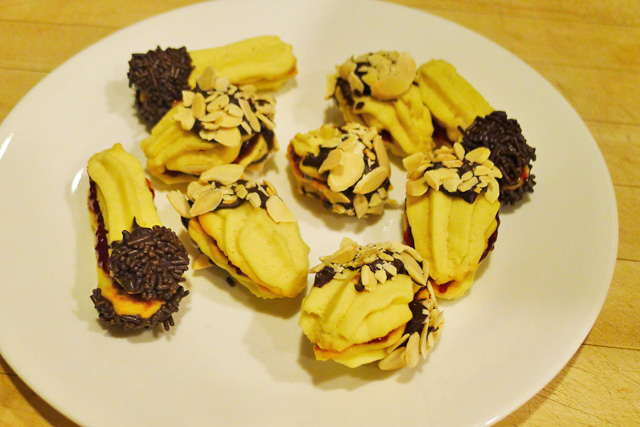
Italian Butter Cookies filled with Raspberry Jam - Crumb Boss recipe

Italian Butter Cookies 
Provided by LisMis on the ChefTalk Forum
1 cup crisco
2 tbs salted butter
3/4 cup confectioner's sugar
2 tsp baking powder
2 eggs
1 1/2 tsp vanilla extract
1/2 tsp almond extract
2 cups AP flour
6 to 7 drops of yellow food coloring

In a stand mixer using the paddle attachment, cream the crisco and butter. Add the confectioner's sugar - mix well. Add the eggs, one at a time, beating and mixing well so that the batter doesn't "break". Add the extracts and food coloring. Cream the batter by beating at medium speed for about 4 minutes (it is important to cream the batter - it impacts the texture of the baked cookie). Add the flour and baking powder - mix well. You might feel like the batter needs more flour, but resist all temptation. The more flour you use, the harder the cookie will be (it won't be that "sandy" texture).

Preheat the oven to 375 degrees.
Line cookie sheets with parchment paper. Try not to use dark coated pans because it tends to result in a cookie that is too dark on the bottom. Pipe the cookies using a pastry bag and a 1M large piping tip.
Bake for about 12 -15 minutes. Do not over bake. Cool on racks. When cooled, you can dip one end of the cookie into melted chocolate and sprinkles (jimmies) for that bakery look... or you can top them with sprinkles, chocolate chips, or non pareils before baking.


Italian Butter Cookies
Adapted from the Crumb Boss
Yield: 2 pounds of dough

Butter 7oz
Shortening 7oz
Confectioners Sugar 1c + 2T
Egg Whites 4
Almond Paste 3oz
Salt pinch
Almond extract 1t
Vanilla extract 1 t
AP Flour 3 1/4 cups
A few drops of Yellow Food Coloring (optional)
Melted Chocolate ( I used Callebaut Semi-sweet)
Sprinkles, Nuts for decorating
Raspberry Jam (I used the brand Bonne Maman)

Cream butter and shortening. Add confectioners sugar.  Add almond paste and beat well until consistent throughout.  Beat in salt and extracts, then add egg whites one at a time and food coloring (if using).  Mix thoroughly.  Add flour and mix just until combined.

Place dough in piping bag with a star tip. I used Ateco tip # 824 (I also tried #826 but thought the cookie was too large).  Pipe the dough into 1 1/2" logs or shell shapes.   Bake at 350 degrees for 10-12 minutes until slightly browned around the edges.  Cool cookies before dipping in melted chocolate and covering with sliced toasted almonds or sprinkles.  Spread raspberry jam on a cookie then sandwich with another cookie.

Italian Butter Cookie - recipe from ChefTalk forum

Wednesday, October 10, 2012

Sugar Cookies

Sugar Cookies
A stack of buttery goodness

So many children these days have food allergies.  My children luckily do not, however they are limited by their finickiness.  I am sharing the sugar cookie recipe that I make whenever I need to bake a sweet treat for school.  It is nut-free, egg-free and liked by most kids.  I don't have the patience to pipe on royal icing and to let it dry so I keep it simple by topping the cookie with sparkling sugar.  The sugar adheres to the cookie without any egg wash, just sprinkle it on evenly before baking.  Use whatever cookie cutters you like, but keep in mind this cookie tends to work better with simple designs.  Pumpkins, stars, circles, christmas trees and gingerbread men have all worked out well.  The number cookies (see pictures below) are sometimes hard to read when baked.

Having fun with numbers

Cookie for my 4 year old
 

Egg-Free Sugar Cookies
Adapted from Art of Dessert
Makes about 2 dozen cookies, 3 inches in diameter
Allergy Note: contains dairy and wheat

1 1/2 cups flour
2 Tbsp. cornstarch
3/4 cup powdered sugar
3/4 cup butter, softened to room temperature
1/2 tsp. vanilla extract
Sparkling Sugar

Preheat the oven to 375 degrees F.
Sift the flour, cornstarch and powdered sugar into a mixing bowl. Add the butter and vanilla extract; mix together to make a smooth dough. Divide in half, cover in plastic wrap and refrigerate if needed. Between 2 pieces of parchment paper, roll out the dough to about 1/4 inches thick. Cut into shapes, transfer onto a cookie sheet lined with parchment paper and sprinkle with sparkling sugar. Bake for 12-14 minutes or until the golden brown.

Monday, October 8, 2012

The Best Homemade Chocolate Chip Cookies in the Entire World?

The Best Chocolate Chip Cookie in the World


When I come across a recipe that claims to be THE BEST of its kind, I naturally tend to be skeptical.  After all, anyone can post a recipe online and believe it truly to be the most outstanding thing they have ever tasted.  But how do I know where their subjective tastes stand in relation to mine?  In my never-ending search for the ultimate chocolate chip cookie recipe, I stumbled across a site called "Parents Need to Eat Too" by Debbie Koenig.  She claimed to have THE BEST HOMEMADE CHOCOLATE CHIP COOKIES IN THE WORLD!  I am glad I set out to validate her lofty claim because she made me a believer. 

These cookies are crisp on the edges with just the right amount of chewiness. When eaten warm, the chocolate melts in my mouth and for a brief moment my inner child grins from ear to ear.  I made a couple of tweaks to the recipe to incorporate my preferences such as using dark brown sugar instead of light and replacing some of the all-purpose flour with bread flour.  Use what you have available, either way, you will not be disappointed.  I cannot say with absolute certainty that these cookies are the best in the whole entire world, but they certainly are without a doubt the best I have ever made.

Using my brand new OXO scale to weigh chocolate.


Scoops of Cookie Dough

Crisp, chewy and irresistable.

The Best Homemade Chocolate Chip Cookie Recipe Ever
Adapted from "Parents Need to Eat Too" by Debbie Koenig
Makes about 2 dozen

Tips for success:
1. Cream the butter and sugars on low speed.
2. When possible refrigerate the dough for 24-36 hours.  If you don't have the time, it will still be yummy.
3. Use good quality chocolate.

1 1/4 cups all-purpose flour
1/4 cup bread flour
1/2 teaspoon baking soda
1/2 teaspoon salt
1/2 cup (1 stick) cold unsalted butter, cut into 1/2-inch pieces
3/4 cup tightly packed dark brown sugar
1/2 cup granulated sugar
1 1/2 teaspoons vanilla extract
1 large egg, at room temperature, lightly beaten
5 to 7 ounces bittersweet chocolate chunks (I use both Callebaut and Ghirardelli together to achieve a more complex flavor)
  1. Sift together the flours, baking soda, and salt into a medium bowl and set aside.
  2. Using a stand mixer fitted with a paddle attachment or a hand mixer, cream the butter and sugars on low speed until it is smooth and lump free, about 3 minutes. Stop the mixer and scrape down the sides of the bowl and the paddle.
  3. Add the vanilla and egg and beat on low speed for 15 seconds, or until fully incorporated. Do not overbeat. Stop the machine and scrape down the sides of the bowl and the paddle.
  4. On low speed, add the flour mixture. Beat until just incorporated. Scrape down the sides of the bowl. Add the chocolate chunks and mix until they are just incorporated. If using a hand mixer, use a wooden spoon to stir them in. Refrigerate dough for at least an hour, and preferably 24-36 hours.
  5. Preheat oven to 350°F. Adjust racks to lower and upper thirds of the oven. Line two baking sheets with parchment paper or silicone mats. Spoon the dough, using a large cookie scooper or a tablespoon, 2 inches apart onto the prepared baking sheets.
  6. Bake for 11-13 minutes or until golden brown around the edges but still soft, almost underdone-looking, in the center. To ensure even baking, turn the sheets front to back and switch racks halfway through.
  7. Remove the sheets from the oven and carefully slide the parchment or silicone mats directly onto a work surface. When cookies are set, remove them to a cooling rack. Wait at least 5 minutes before serving or 20 minutes before storing in an airtight container for up to 3 days at room temperature.

Wednesday, October 3, 2012

Bubble Guppies Ice Cream Cake

Slice of Blue Vanilla Ice Cream Cake

 My youngest son turned 4 today. I labored hours upon hours, over the course of several days to make him a Bubble Guppies cake. For those of you who are not avid Nick Jr. fans, it is a very cute somewhat educational show about underwater mermaid/merman-like preschoolers. I made him a blue-colored vanilla ice cream cake with several gum-paste cake toppers. I am proud of how the cake turned out, but somewhat disappointed at the birthday boy's reaction. Of course he liked the cake, but he took maybe 4 bites and went off to play with his new presents. Sigh. I think I could have bought a supermarket cake and received the same reaction.  I am posting this for all the other obsessive moms who will spend countless hours to create the best possible version of these characters for their little ones.

To my little guppy, I wish you a wonderful 4th birthday!

Frozen in a pan with a removable bottom surrounded by parchment paper
2 layers of Vanilla Ice Cream in 2 shades of Blue

Molly,  Mr. Grouper,  2 crabs, Bubble Puppy and Gil


Curly Candles to complete the cake

Thursday, January 26, 2012

Waffle Cones/Bowls Revisited

Joy of Cooking
So I know I blogged about waffle cones 2 weeks ago, but it's in my obsessive nature to surf the web until I feel I have exhausted my search.  I'm pretty certain I can add "FIND THE PERFECT WAFFLE CONE RECIPE" to my bucket list along with the perfect chocolate chip cookie and other recipes that elude me.  I enjoy the process and keep mental checklists of foods that I love and want to make.  Waffle cone recipes are easy to throw together.  I tried two recipes : one from the Joy of Cooking and the other by David Lebovitz's The Perfect Scoop.  Being the King of Ice Cream, I was hoping David's recipe would be top notch.  I am sad to report that it was one of my least favorite attempts to date.  The recipe gets 5 stars for appearance and sturdiness, but along with that came a tough, thick cookie that lacked flavor. As it cooked the nice buttery cookie aroma was missing - all I smelled was flour. The Joy of Cooking recipe had a better aroma and taste. Both recipes were not easy to roll into cones. Instead, I opted to make them into waffle bowls by inverting them onto ramekins.

I am surprised that I haven't found more blog postings about making waffle cones. It seems that many of the stores use a purchased mix and just add water to make their batters. I am so tempted to buy a mix just to try it out, but I am certain a made from scratch recipe is out there for me. Otherwise I will need to tinker with the one really good recipe I have to see if I can improve upon it. Just to recap, I have made 5 different ice cream cone recipes so far and the clear winner at the moment is the one from IceCreamUniversity.org - read my previous post. Rest assured that I will be making more in the future - all this experimenting is for me you.
Top View of Waffle Bowls - Joy of Cooking (left) - The Perfect Scoop (right)
Side View of Waffle Bowls - Joy of Cooking (left) - The Perfect Scoop (right)
Close up of Waffle Bowls - Joy of Cooking (left) - The Perfect Scoop (right)
Joy of Cooking Waffle Bowl served with Homemade Ice Cream - yay!

Thursday, January 19, 2012

Chickpea Croquettes

Chickpea Croquette

Up until now I was a firm believer that a dinner meal should consist of an animal protein, a starch and a vegetable. Having flirted with veganism for the past few weeks, I no longer miss meat when it is absent. Don't get me wrong, I still enjoy a good steak or lamb chop, but if I only eat meat twice a week that is fine with me. Today I have a nice vegan recipe to share. I was pleasantly surprised that it was flavorful and satisfying enough to keep me from craving anything else. My husband thought it was delicious as well, so we have a new dish to add to our rotation.

I must admit that I was a little worried when I started cooking today. Last week I made a very yummy black bean soup. Although it tasted great, I can never make it again. All the negative press about beans causing gastric distress came to pass (yes, pun intended). I would have shared that recipe with you, but I like you too much to put you through any embarrassment or pain. The croquettes have whole chickpeas and chickpea flour in it...a possible double dose of trouble. Maybe it's TMI, but we did not escape the side effects. Was it terrible? No, not black bean soup terrible. Based on this isolated incident I would brave the chickpeas again...gassiness and all.

Chickpea/Garbanzo Bean Flour
Chickpea Flour, Cumin, Salt, Chili Powder
Red Peppers, Chickpeas, Garlic with Lemon, Olive Oil, and Parsley
Mixing the batter
Croquette Batter
Cooking in a non-stick pan with olive oil
Chickpea Croquette
Top with chopped tomatoes and lettuce

Notes: I didn't follow the recipe exactly since I was lacking some ingredients. I skipped the scallions/green onions. The original recipe calls for a Greek salad topping, but I didn't have any cucumbers. Instead I topped it with chopped tomatoes (seasoned with olive oil, S&P), shredded lettuce and Trader Joe's Goddess dressing. I just discovered the Goddess Dressing. I really like it but be forewarned it is high in fat and calories. A little goes a long way.

Chickpea Croquettes
Adapted from Vegetarian Times

1 cup chickpea flour
2 tsp. ground cumin
1 tsp. chili powder
1/2 tsp. salt
1 15-oz. can chickpeas, rinsed and drained
4 green onions, chopped (1/2 cup)
1/2 cup diced red bell pepper
1/4 cup chopped fresh parsley
2 Tbs. lemon juice
1 Tbs. olive oil
2 cloves garlic, minced (2 tsp.)

1. Whisk together chickpea flour, cumin, chili powder, and salt in bowl. Whisk in 3/4 cup hot water. Stir in remaining ingredients, and season with salt and pepper, if desired.

 2. Coat nonstick skillet with cooking spray; heat over medium heat. Scoop 4 ı/4-cup dollops of chickpea mixture into skillet, and reduce heat to medium-low. Cook 3 to 4 minutes, or until golden.

3. Flip with spatula, and cook 3 to 4 minutes more. Repeat with remaining chickpea mixture. Serve each Croquette topped with chopped tomatoes (seasoned with olive oil, S&P), shredded lettuce and Trader Joe's Goddess dressing.

Sunday, January 15, 2012

Waffle Cones

Chef's Choice Waffle Cone Maker

I felt like a kid in a candy shop today. Yes, I realize what makes me giddy doesn't necessarily float everyone else's boat, but I know I'm not the only one who gets excited about kitchen gadgets and appliances. Today I took my new waffle cone maker and cone holder for a test drive. Unfortunately I couldn't find many homemade ice cream cone recipes online. I picked 2 promising recipes and set out with high hopes to make a delicious cone.

The first recipe was very good. The cone smelled good while cooking and it tasted good. I wish it had been thicker and less fragile with more of a chew to it. The kids enjoyed the cones with some store-bought ice cream. Yes, I know it's almost blasphemy to serve homemade cones and not have homemade ice cream, but I didn't have the energy to do both today. Tomorrow is another day. I probably should have quit while I was ahead, because the second recipe was a bust. The batter was way too thin and yielded a mess. There were holes in the cone which sorta defeats the purpose of using a cone as a vessel to contain ice cream. It called for using a pizzelle maker, but I still proceeded with my cone maker. Perhaps it was my fault for not following the recipe. Anyway, I added some extra flour, egg and powdered sugar to try to improve the consistency of the batter. It helped a little, but still was not great. It was an ok tasting cone, but definitely not better than the first recipe. If anyone out there has a great cone recipe to share, please send it to me!  I promise to invite you over for ice cream. :)

Prior to today I tried the Gourmet Waffle Cone recipe that comes with the Chef's Choice machine. I give that recipe a thumbs down. Too thick and lacking flavor. The recipe that was a bust was from Foodista.

Waffle Cone Batter
Cooked until Golden Brown
Form into a cone shape
Stacked cones on the nifty cone holder


Waffle Cone Recipe
from IceCreamUniversity
http://icecreamuniversity.org/waffle-cone-recipe/


Ingredients:
3/4 stick sweet butter
1/2 cup sugar
1/2 teaspoon vanilla extract
1/2 tablespoon water
3 egg whites
1/2 cup flour


Preparation:
- Melt the butter slowly
- Beat the egg whites and add the sugar to them
- Combine the egg white mixture with the butter mixture
- Add the vanilla extract and water
- Add the flour to the above mixtures, blend well.
- Let the batter stand for one hour in the refrigerator.


The waffle cone baker is now ready for baking. At this point, simply follow the instructions for using your waffle cone maker.

Yield: 8-10 cones